Posts

Showing posts from July, 2022

Distress Oxide Sprays with Hibiscus Layering Dies

Image
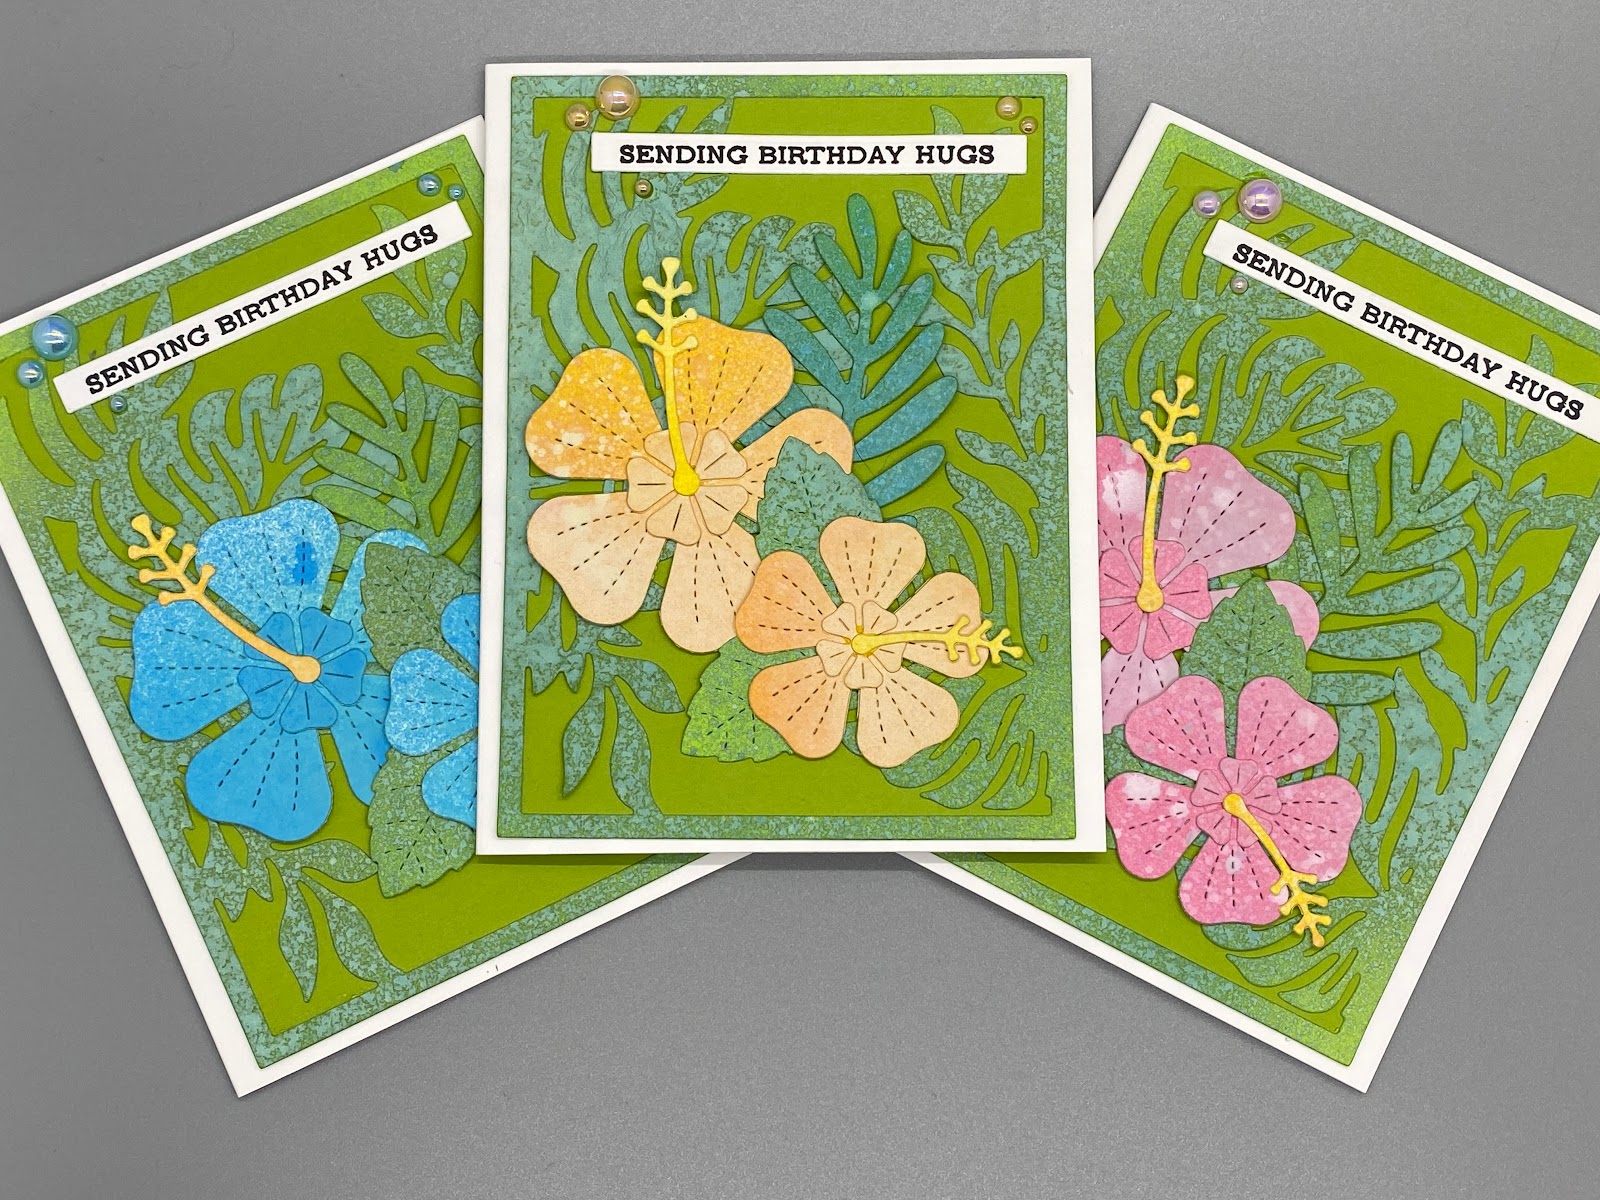
I made these flowers a long time ago but I wasn't sure what I wanted to do with them. To make the flowers, I used Distress Oxide Sprays  to color sheets of similar colored cardstock from my stash. Because I made these so long ago, I don't remember the exact colors used. Once the cardstock was dry, I made the Hibiscus's using Lawn Fawn's Happy Hibiscus Die Cuts . I cut another large leaf from Lawn Fawn's Tropical Leaf Die Set . I then die cut my leftover green sheets from Paper Rose's Palm Leaf Frame  to fill up the rest of the background.  Once all the die cutting was complete, I messed around with where to place the die cuts until I found a layout I liked and glued them down. I picked a sentiment from Altenew's Sentiment Strip 3 Stamp Set and placed it towards the top of the card. Finally, I added embellishments from Trinity Stamps . LINKS Distress Oxide Sprays [ Scrapbook ]  Lawn Fawn Happy Hibiscus Die Cuts [ Scrapbook ] [ SSS ] Lawn Fawn Tropical Leaves

Gel Press Background Using Nuvo Shimmer Powder

Image
The flowers for these cards were made using Altenew's Build-A-Flower: Lavender. This set seems to be retired, but I think this card would also work for Build-A-Flower: Hyacinth or Build-A-Flower: Snapdragon . I used Enchanted Garden and Shades of Purple Ink Sets . I do not remember the exact greens I used for the stem but they are also Altenew Inks . The card front is made using Strathmore Watercolor Paper . To create the background, I used a hexagon shaped gel press and placed it in my MISTI . I then put Nuvo Shimmer Powder on the gel press and sprayed it with water using a Distress Sprayer from Tim Holtz . For the darker purple card, I used Falling Leaves and Violet Brocade . For the lighter purple card, I used Falling Leaves and Lilac Waterfall . I then stamped this onto a card front that I had cut using Tim Holtz Deckle Edge Trimmer down to 4x5.25". Using the purple color of the Nuvo Shimmer Powder, I put down some extra powder into a palette and mixed it with water.

Sunflower Banner Cards with Distress Oxide Ink Background

Image
This card set was made using Honey Bee Stamps Lovely Layers: Sunflowers Die Set . I made several flowers using the 6x6 paper packs from Memory Box. These dies are incredibly easy to layer as each layer lines up with the previous one.    With each set of 6x6 sheets, I was able to make 2 sunflowers. The remaining paper was used for a card set previously shown on my blog. The centers of the flowers are made using cardstock from Taylored Expressions - Dijon and Honey.  Because I intended to use water, I placed each background on a sticky sheet cut down to slightly smaller than an A2 card front to reduce warping. Each background was made using various colors of Distress Oxide Ink using a brayer. Once all the color was on the paper, I lightly sprayed each sheet with water. The colors used are listed below. Pink: Spun Sugar , Kitsch Flamingo , Picked Raspberry Red Orange: Saltwater Taffy , Worn Lipstick , Abandoned Coral  Orange: Dried Marigold , Carved Pumpkin , Ripe Persimmon Yellow: Scatte

Stamping on Dark Cardstock with Layering Stamps

Image
I made this card set by challenging myself to use white ink on dark cardstock. This set uses a stamp set from Altenew called Build-A-Flower: Camellia Layering Stamp Set  but this technique will work with other layering stamp sets. To create the background, I took the top layer and stamped it randomly in white ink on several colors of dark cardstock which is also my card base. The white ink I used is Hero Art's Unicorn White Pigment Ink . To create the flower, I first stamped the bottom layer in white ink. The middle layer is stamped with a dark ink that matched the cardstock, and finally the top layer is heat embossed with the same embossing powder I used for the sentiment. The leaves were just stamped in white ink. I then die cut out the flower and the leaves and popped them up using foam tape on my background. The sentiment is from Altenew's Build-A-Flower: Columbine Layering Stamp Set and is heat embossed with Ranger Silver Pearl Embossing Powder .  This card was very quick

Die Cut Layering Flowers and Easy Distress Oxide Ink Background

Image
  This card set was made using Altenew's Craft-A-Flower: Cosmos Layering Die Set . For each color set, I used various pieces from Memory Box's 6x6 Paper Packs. These sets are perfect for layering dies as they match perfectly. I die cut out multiple flowers of various colors to complete these cards.  For the background, I used a Tim Holtz Distress Brayer and various distress oxide ink colors. The colors are listed below. I randomly placed the color on Neenah Classic Crest 110# Cardstock . I tried to keep straight lines going up and down or left to right. Once all the color was down, I lightly sprayed each background with water.  Pink: Spun Sugar , Kitsch Flamingo , Picked Raspberry Orange: Dried Marigold , Carved Pumpkin , Ripe Persimmon Yellow: Scattered Straw , Mustard Seed , Fossilized Amber Blue: Tumbled Glass , Salty Ocean , Prize Ribbon Purple: Shaded Lilac , Wilted Violet , Dusty Concord Once the cardstock was dry, I trimmed each piece down to slightly smaller for an A2

Rainbow Stenciling

Image
This card was made using a stencil from Brutus Monroe but after making this card, I want to try this technique with a variety of stencils. I believe this stencil was from a card kit but I linked a similar stencil from Brutus Monroe below. The card was pretty simple to make. I taped my card front onto my work surface and taped the stencil down over it.  I used Simon Says Stamp Pawsitively Saturated Inks in the colors: Lemonade , Carnation , and Marine . When I ink blended , I made sure the colors overlapped to get the colors in-between for a complete rainbow. I then stamped a sentiment from Simon Says Stamp called CZ Designs Well Wishes and a smaller sentiment from the same stamp set. To finish the card, I placed some embellishments from Little Things from Lucy around the sentiment.  I made a similar card but I masked off a portion so that there was a straight edge for the inked portion. I used the same colors. For the sentiment, I used stamps from a Pink Fresh Studio set called My Fav

Dogwood Sympathy Card with Colored Pencil

Image
  I made this card to practice coloring with colored pencils as I'm not that great at coloring. The stamp set the floral image is from is Colorado Craft Company's Big & Bold Thank You Dogwood stamp set. Colorado Craft Company has beautiful stamp sets that cover up a large area of the card. I wanted to challenge myself and color on a non-white card base so I made this card on Classic Craft Cardstock from Papertrey Ink . I used Prismacolor colored pencils but I don't remember the exact colors I used. I stamped the image in black ink and first colored the entire image with white colored pencil. I then used a variety of pink colored pencils for the petals but I tried to keep the flower mostly white or light pink. I did the same with the leaves and stem but with greens and browns. To smooth out the coloring, I used Prismacolor's Colorless Blending Pencil . The colored pencils dulled the black ink, so I restamped over the image in black ink.  To finish the card, I stamp

Clean & Simple Floral Card Sets with a Layered Look

Image
I made multiple variations of this card set for my mother-in-law. These cards were quick and simple to make. The notecard set was made with Gina K Design's Sketched Flowers Stamp Set and Gina K Designs Inks . I first cut out several die cuts from Lawn Fawn's Outside In Stitched Scalloped Rectangle Stackables Die Set from Neenah Solar White 110# Cardstock . Using the MISTI (any stamping tool will work), I placed the flower petals where I wanted them on the white cardstock.  I used a variety of Gina K Designs Inks however any inks will work as long as you have a lighter and darker color. I stamped each card base with the light ink color for each color I was using. Without moving the flowers, I put a darker color ink on each stamp but prior to stamping, I wiped away the ink from the edges with a clean lint free cloth, trying to drag out the ink from the middle towards the edges to create some variation. I then stamped the flower centers, stems, and sentiment. For the Thank You

Faux Watercolor Poppy Flowers

Image
  This card was made using Nuvo Shimmer Powders to create a watercolor look. I first white heat embossed Simon Says Stamp's Poppies Background stamp onto hot press watercolor paper. I know many crafters prefer cold press, but I find I have better luck heat embossing onto hot press watercolor paper due to the smoothness of the paper. I then taped the paper down onto cardboard to decrease the amount of warping.  I then used Maroon Spark and Sunray Crosette Nuvo Shimmer Powder for the petals of the flowers. I put each color in the general area of where I wanted it while the paper was still dry. To get the powder onto the paper, I held the bottle over the paper and tapped the bottom of the bottle. Squeezing the bottle causes too much pigment to squeeze out. Only a small amount of pigment is necessary.  I then sprayed the entire sheet heavily with water, allowing the pigment to spread out. Once the paper had dried a little but was still damp, I could move any clumps of pigment aroun